


Brake cable tunnel
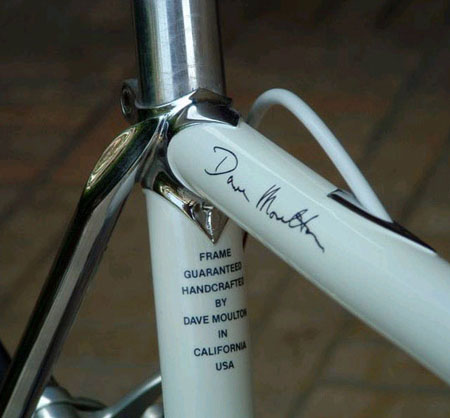
A brake cable tunnel through the top tube was an optional extra that I offered initially on my custom frames, it included a shield shaped re-enforcing plate where the slot was cut in the tube.
This thin steel plate brazed in place was mainly for decoration, and was often chromed as shown here. Structurally it was unnecessary and later when I offered the tunnel as an extra on the Fuso I dispensed with the little plate.
Had I simply cut slots in the top tube to thread the cable outer housing through, then some form of re-enforcement would have been necessary, as the top tube would have been considerably weakened by cutting slots in it.
I did not like this approach as moisture can enter through the slots causing corrosion inside the top tube. I made my tunnels a self contained and sealed unit.
I did this by first cutting the slots. Then I took a thin steel tube with a hole just big enough for the brake cable inner wire to slide through, bent it to a curve, then after measuring the length I brazed a short piece of a larger diameter tube on each end of the first tube.
This assembly was then threaded through the slots and was brazed into place; in the case of a custom frame the shield-shaped decorations were added at this time.
Then with a hand held drill and a drill bit just slightly larger than the outside diameter of standard brake cable housing, the tunnel entrance was drilled out from either end. See drawing below.

Finally, the surplus tube was cut off and filed flush with the outside of the top tube. Or in the case of a custom frame, flush with the re-enforcing plate. See the following illustration.

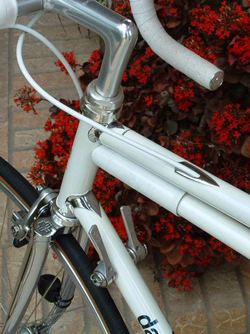
With this system the cable housing went from the brake lever to just inside the front end of the tunnel; the bare wire went through the thin steel tube, and another short piece of cable housing went from the rear exit point to the rear brake.
It did however call for some maintenance. Although no moisture could enter the top tube, the cable entry point could collect water as it drained down the outer cable.
Customers were advised to keep both the inner wire well greased to keep friction down, but also to grease the cable housing where it entered the top tube, to keep moisture out.
 Even on the custom frames with chrome as shown here I would still advise plenty of grease at the entry points.
Unfortunately I have noticed some frames with tunnels that have a creeping rust problem from inside the hole to the outside surface of the top tube.
This would have to be pretty bad to become a structural problem, because of the way the tunnel tube was assembled as described here.
If you have this problem, unless you are planning on a complete repaint; I would advise to clean the surface rust down to the bare metal, treat with Navel Jelly, and touch up paint.
Let the paint dry thoroughly, and then apply plenty of grease as previously described. You might also consider using some clear silicon sealer at the entrance point. (The type of sealer used in kitchens and bathrooms.)
Fill the entrance hole at both ends with silicon; assemble the whole thing complete with inner wire. When the silicon is dry, remove the inner wire, grease thoroughly and replace.
But remember, paint and silicon don’t mix, and neither will silicon and grease, so take your time and do one step at a time. Allow paint to dry, then allow silicon to dry and then ad grease to the inner wire.


 Dave Moulton
Reader Comments (13)
Interesting view into the frame building process. Enjoyed the shots of your frame example as well.
If you have rusty chrome, oxalic acid, aka wood bleach, will do a fantastic job of removing the rust without damaging paint or chrome.
Oxalic Acid. Removing rust from Chrome the very best way! - VintageBMX.com
I recently tried it on an old road bike frame with chromed stays and fork blades and I was amazed with the resuts.
Never had a bike with this feature but always wondered how it was done. Thanks for the insight.
Dave, I have wanted to ask this question for a long time, you may be one of the few people who can answer it.
I have an Italian steel frame from the 90's with internal cable routing. The brake cable buzzes. It stops when I apply the brake.
I am riding the bike as a single speed, so if wasn't for that buzzing, the bicycle would perfectly silent.
How do I stop the buzzing?
Thanks.
"... I have an Italian steel frame from the 90's with internal cable routing. The brake cable buzzes. It stops when I apply the brake...How do I stop the buzzing?"
I just recently solved this problem on my Felt F75 by gently pushing a little more of the cable and housing into the top tube. Giving the internal cable a little more slack in the top tube fixed it immediately. I even did it while riding. Voila a long time annoyance instantly solved. What a relief.
I think before I pushed it in, the cable was cinched a little up against the top tube which was causing the buzz
Hi Dave. I was wondering: when you have chromed lugs such as shown, when the frame was built (filed, sanded, etc), was it then fully chromed so that when it was painted, you could leave the lugs alone, as well as any part of the frame you chose?
Those shields, and the hidden cable, sure look sharp, Dave.
And great care in the construction — fine work.
Maltese Falcon,
I wrote an article on the chrome plating process here.
Dave
If you have an internal cable routing that is simply two slots where the cable lays inside the tube, it will rattle or buzz if it is touching the inside of the tube.
If you place two small zip-ties at either end of the cable where it enters the tube, it will suspend the cable so it is not touching the inside.
A less noticeable way to do this would be to use two small rubber “O” rings; in which case you would need to cut grooves in the cable’s plastic casing to hold the rings in place.
Dave
Dave, thanks!! I'm going to have a frame chromed and I can now speak with a little bit of intelligence on the matter with the chroming company.
Very interesting. My Brian source frame doesn't have internal but has lovely round eyelets that guide the cables.
A very nice touch though Dave. Why oh why can you not go into production again.
I've seen this tube made from brass on recent frames. Seems like that should solve the corrosion issue entirely.
Hi Dave. I've always wondered if there is any "safe" spots in a steel frame to drill holes to save weight. I've seen track bikes that have the bb shell machined to a cheese. Even saw a boutique bmx that had holes in the head tube. I have a reynolds 501 beater mtb frame, and I've been thinking of experimenting with it. The toughest riding I do is trail riding. What do you say?